The Complete Guide to Dimensions in Android
Posted on February 8, 2019 (Last modified on December 27, 2022 )
5 minutes • 1006 words
This project uses these versions of languages, frameworks, and libraries.
-
 android
: No idea, sorry.
-
 kotlin
: 1.2.60
This tutorial may work with newer versions and possibly older versions, but has only been tested on the versions mentioned above.
Figuring out when to use dimensions in Android can be a tricky time. Should all values be a dimension? How about none of them? You could argue that both of these are valid, but I’d like to clear the air with the statement “sometimes you should use dimension values.” But how do you know when?
Dimensions for Reusability
The simplest reason to use a dimension value is when you know that value needs to be reused. If you were to change this value in one place, you would want to change it elsewhere — that’s a perfect case for a dimension value. A great example of this involves a grid that I was working with. We put the grid item width and height into a dimension and then leveraged that for the headers as well.
<dimen name="grid_item_width">40dp</dimen>
<dimen name="grid_item_height">40dp</dimen>
<dimen name="grid_column_height">25dp</dimen>
<dimen name="grid_row_width">15dp</dimen>
Here we’re setting up 4 dimension values, two for the grid item, and one for the column width and row height. We’ll use the item width and height for the missing values of the column and row to keep our grid uniform. To keep things, simple, we’ll avoid the recylerview and viewholder and simply do a 1×1 grid.
<androidx.constraintlayout.widget.ConstraintLayout
  xmlns:android="http://schemas.android.com/apk/res/android"
  xmlns:app="http://schemas.android.com/apk/res-auto"
  android:padding="15dp"
  android:layout_width="match_parent"
  android:layout_height="match_parent">

<TextView
  android:id="@+id/column"
  android:layout_width="@dimen/grid_item_width"
  android:lyout_height="@dimen/grid_column_height"
  android:background="#f00"
  app:layout_constraintStart_toEndOf="@+id/row"
  app:layout_constraintTop_toTopOf="parent"
/>

<TextView
  android:id="@+id/row"
  android:layout_width="@dimen/grid_row_width"
  android:layout_height="@dimen/grid_item_height"
  android:background="#0f0"
  app:layout_constraintStart_toStartOf="parent"
  app:layout_constraintTop_toBottomOf="@+id/column"
/>

<TextView
  android:id="@+id/grid_item"
  android:layout_width="@dimen/grid_item_width"
  android:layout_height="@dimen/grid_item_height"
  android:background="#00f"
  android:text="my item"
  app:layout_constraintStart_toEndOf="@+id/row"
  app:layout_constraintTop_toBottomOf="@+id/column"
/>

</androidx.constraintlayout.widget.ConstraintLayout>
If we look at the design view in Android studio, we should see something like this:
While this isn’t particularly interesting on it’s own, what is neat is that we can
update the value of @dimen/grid_item_width and @dimen/grid_item_height to change
the size of the grid item, while still maintaining an appropriate looking grid.
Let’s update that value to be 200dp. Here’s our new dimens.xml
<dimen name="grid_item_width">200dp</dimen>
<dimen name="grid_item_height">200dp</dimen>
<dimen name="grid_column_height">25dp</dimen>
<dimen name="grid_row_width">15dp</dimen>
That alone seems like a great reason to use dimensions in Android, but it’s certainly not the only reason!
Dimensions for Screen Density
Given how popular ConstraintLayout is, it’s sometimes easy to forget that screen density is even a thing. However, like all resource files, you can build a dimens.xml for different screen densities or other device properties (such as Locale). Perhaps you want different measurements on high density devices or you may even want to remove extra margins on small density devices. The dimens.xml file can be qualified to a screen density to allow customization on different devices.
Let’s take the same example from above and set a goal: We want to remove the padding on the constraint layout on low density screens. On a high density screen, the padding may be appreciated as it helps move our “grid” away from the edge of the screen. However, with low density, we may not have enough screen space to add that padding. We can use dimens.xml to help.

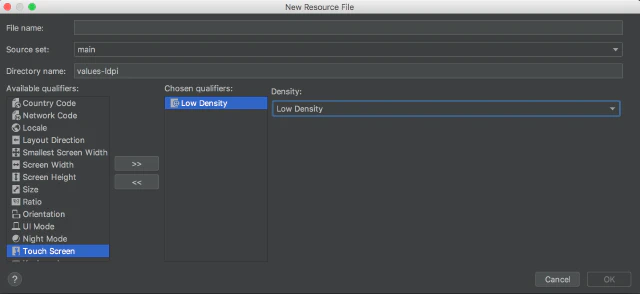
Alternatively, you can create a new folder in your resource directory called values-ldpi
and add a dimens.xml file to that.
Once you’ve done either of these steps, you should see the new file in Android Studio.
<dimen name="grid_padding">0dp</dimen>
Of course, we’ll want to use this property on devices that aren’t low density, so we’ll need to add it to our regular dimens.xml as well.
<dimen name="grid_padding">15dp</dimen>
Finally, we can update our view to use the new dimension value.
<!-- Updating padding to use @dimens/grid_padding -->
<androidx.constraintlayout.widget.ConstraintLayout
  xmlns:android="http://schemas.android.com/apk/res/android"
  xmlns:app="http://schemas.android.com/apk/res-auto"
  android:padding="@dimens/grid_padding"
  android:layout_width="match_parent"
  android:layout_height="match_parent">
<!-- End Update -->

  <TextView android:id="@+id/column"
    android:layout_width="@dimen/grid_item_width"
    android:layout_height="@dimen/grid_column_height"
    android:background="#f00"
    app:layout_constraintStart_toEndOf="@+id/row"
    app:layout_constraintTop_toTopOf="parent" />

  <TextView android:id="@+id/row"
    android:layout_width="@dimen/grid_row_width"
    android:layout_height="@dimen/grid_item_height"
    android:background="#0f0"
    app:layout_constraintStart_toStartOf="parent"
    app:layout_constraintTop_toBottomOf="@+id/column" />

  <TextView android:id="@+id/grid_item"
    android:layout_width="@dimen/grid_item_width"
    android:layout_height="@dimen/grid_item_height"
    android:background="#00f"
    android:text="my item"
    app:layout_constraintStart_toEndOf="@+id/row"
    app:layout_constraintTop_toBottomOf="@+id/column" />

</androidx.constraintlayout.widget.ConstraintLayout>
If we set our project to use the 2.7″ QVGA Slider (a low density device) you can see that our padding has been removed!
Converting Dimensions to Pixels
The third reason to use dimensions in Android makes it easy to convert dp values or dip values into to pixels. This is somewhat of an odd use-case, but definitely has it’s practicalities. We can take any of our existing dimensions in our dimens.xml file and, in our code, convert a dp or dip value into pixels like so:
val dimenAsInt: Int = resources.getDimensionPixelSize(R.dimen.grid_item_width)
Additionally, you can get them as a float, like so:
val dimenAsFloat: Float = resources.getDimension(R.dimen.grid_item_width)
When Not to Use Dimensions
Likely, dimensions seem to be the correct way to store your dp or dip related values. However, there are some cases where dimensions may not make the most sense. Values that don’t fit any of the three recommendations above, should generally be left out of the dimensions file, as it can make those values more difficult to maintain and change.
Instead of simply adjusting the value in your layout, you must now locate the dimensions file for it and adjust the value there. While you could still make the case for keeping all values in dimens.xml, I personally feel that this is overkill.
If you’d like to learn more about more about Android development, you can find more of my posts on the subject here ! Additionally, you can find the documentation for Dimensions here! Thanks for reading!

